

How to make a "Voodoo doll"
As I began to research what is widely known in the US as Voodoo dolls, I came to realize that these dolls work best when made by the person that intends to use the doll. The reason for this is simple. The religion of Voodoo is very similar to other religions such as Wicca in that it centers around a practitioner's intentions. When a witch creates a potion or casts a spell, their intention for that potion or spell must be molded into it as it is being created. The same applies to Voodoo.
It should also be noted that only an initiated Voodoo practitioner has the true right to use such objects as dolls or potions or other tools of the religion. If you choose to make your own doll, understand that it will not be a true Voodoo doll because you are not a true practitioner of that religion. Proceed with caution and understand that my instructions are for creating a doll. I am not a Voodoo practitioner any more than you are. This is for entertainment value only. I have done my best to put together the most authentic doll I could with the limited knowledge I have found through internet research. Be sure to read through these instructions completely before attempting to make your doll.
Step One: Intentions and Supplies
The First thing you need to do before touching any supplies at all is decide on your intention for the doll. Who do you want the doll to represent? What do you want to accomplish with the doll? Just because you want the doll to represent a certain person or yourself, doesn't mean it has to resemble them. Don't let that intimidate you. Your doll can be as plain or elaborate as you wish. My doll took about two hours to make, from start to finish. Yours could be quicker or take a whole day. It's up to you. The most important thing is to focus your mind on your intention for the doll as you make it. Each time you start another step, refocus yourself on who the doll is and what you want for them. It can be good intentions or bad. That is also up to you. Although I would hope you choose good intentions. The world needs more of that.
Once you have your intentions decided upon, you can make a craft store run and pick out your felt, embroidery thread for sewing, sharp scissors for cutting through the felt, buttons for eyes, or any other embellishments you wish to use on your doll. Google search voodoo dolls or poppets to get a feel for the design ideas out there. This can help you decide what you want yours to look like.
You'll also want to decide on what herb you want in the chest pouch and what you want to stuff your doll with. The chest pouch is meant to hold the herb in the center of the doll so you can puncture it with your pin and activate your desired intention with each puncture. I used chamomile since my intention for the doll was that it would bring me better sleep and help me manifest wealth for my family.
Here is a list of herb ideas for your chest pouch.
Chamomile - Sleep and Money
Rose Buds - Prophetic Dreams
Catnip - Love and Beauty
Jasmine - Wealth
Penny Royal - Removes Curses
Mistletoe - Wards off Night Terrors
Mandrake - Fertility
Black Salt - Keeps Negativity away from the target of the doll
Stuffing Ideas for your doll include but are not limited to:
Cotton
Moss
Scraps of clothing belonging to your target
Hair from your target
My supply list included notebook paper to draw and cut my doll and heart pattern, a ball point pen to trace the pattern onto the felt, a brown felt square and a red felt square from Michael's Craft store, black embroidery thread, a button I had from a ripped shirt I threw out, dried Chamomile leaves, sharp shears because cutting the felt was tougher than I thought, and cotton stuffing.
Step Two: Make Doll, Pouch, & Heart Patterns
Use your pen to draw a rough outline of your doll. Make sure it is small enough to fit on the square of felt when it is folded in half. This is how you get two identical sides of the doll to sew together and stuff. You also want to make sure the doll is big enough to be able to stuff with your small chest pouch and stuffing.
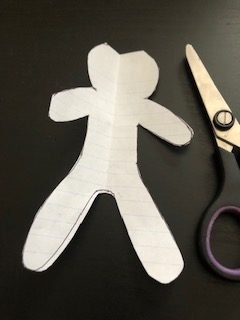
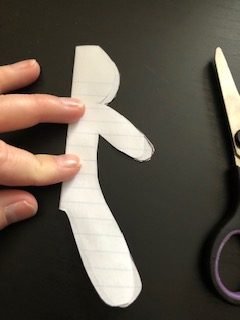
Once you draw your doll on the paper, cut it out and fold it in half right down the middle. This makes it easy to trim so that both arms are the same, both legs are the same, and the head is evenly round.
Draw a simple oval for your chest pouch. When you draw your chest pouch, make sure it is large enough to stuff with herbs but small enough to fit inside the chest of your doll once the doll is sewn. Give a little extra room on each side of the chest where the seams will be so the chest pouch fits inside nicely along with the stuffing around it.

Once you draw your heart, if you choose to sew a heart on the front of your doll, fold it in half like you did the doll pattern so you can trim it to make it look even on both sides. Unfold it and hold it up to the doll pattern to ensure the size is correct and it won't be too big or too small for your doll. As you can see, my first heart attempt was too small so I made a bigger one.

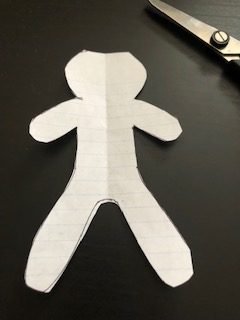
Trace your paper patterns onto the felt by pinning them to it, if needed, so it doesn't shift while you are tracing and cutting. You'll be surprised how tough cutting through two layers of felt is when your scissors aren't sharp. Fold the doll felt in half and position the pattern so you will end up with two exact doll shapes that you can sew together to create the stuffed doll but don't sew them together yet. It's definitely easier to add the decorations you want like the doll's face, heart, and any scars or markings before the doll is sewn together. I forgot the mouth and had to sew it on after the entire doll was sewn together. That was a pain.


Also fold the chest pouch felt so you will end up with two identical pieces of that after cutting the pattern for the chest pouch. The heart won't need to be doubled because you only need one heart to sew to the front of your doll, if you are opting for a heart on your doll. That is optional and only for looks.

Step Three: Sew & Stuff Chest Pouch
I know I did things in a slightly different order in my pictures but I am telling you to do things in the order I wish I had done them in. Learn from my mistakes! lol
When I sewed the pouch together and the doll together, I cut a large piece of embroidery thread and then pulled a strand from the bundle of six strands that make up the embroidery thread. I then threaded this on my needle and tied the end. This gave me one thread to sew those items together with.
However, when I sewed the eye, mouth, and scar on, I wanted it to be very dark and noticeable. Therefore, I pulled one strand from the black thread, threaded it on my needle, pulled it through until both ends of the thread met, and tied those together. This gave me a double strand to sew the details of my doll on, making it darker and more defined.
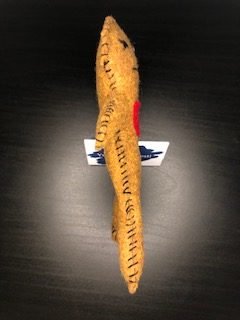
Now, you can sew your chest pouch until just the top is open. This allows you to add the herbs you've chosen and not spill them everywhere while you are trying to sew. Once you have your herbs in the chest pouch, sew the top closed and tie it off. I am not much of a seamstress so I can't explain how to sew very well but there are plenty of videos on YouTube to teach you that. I'll leave that to the experts! I purposefully made my stitches uneven because I wanted my doll to have a rustic look. Yep, totally did that on purpose.

Step Four: Sew Decorations on the Doll
This is the part I didn't do in order and it was a pain. I started sewing the doll together before I added any of the decorations I'd chosen for my doll. Definitely do that before you sew the doll and stuff it.
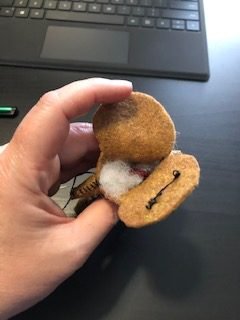
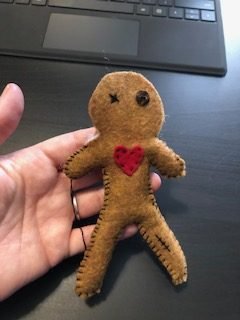
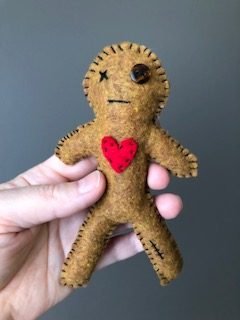
I added a scar on one leg and a heart on it's chest, just to show you what that would look like. I also sewed a button on for one eye and a black X for the other eye so you could see what each of those look like. You could do both eyes as buttons or do both eyes as an X. You could even give it a smile or teeth or eyebrows or whatever your creativity and sewing skills allow. Have fun but remember to continue to think about your intention for the doll. That part is the most important part. Otherwise, your doll will simply be something cute to look at and not functional at all.

Step Five: Sew & Stuff the Doll
Once you have all your decorations on your doll (front and back if you want stuff on the back of it) you can begin the process of sewing your doll together. I suggest starting on one shoulder of the doll and moving down the arm and the leg, moving up the inside of that leg, moving down the other leg, and then up the outside of that leg and other arm. Understand that I didn't do it in this order, but I wish I had. It would've been easier than the way I did it.

Once you have the body sewn, you can stuff it. I used my closed pen because it was the perfect size to work the stuffing down into each limb. Once it is filled up to the hips, you can place your chest pouch inside and squish stuffing all around it and work stuffing into the arms just as you did the legs.
When your doll is stuffed up to it's neck, you can finish sewing until the gap in the head is just big enough to fit the last of the stuffing into the head. Stuff it as tightly or loosely as you want and complete sewing the head together. Your doll is done! Great work!
At this point, you can meditate with your doll or you can stick it through the herbs with a pin to activate whatever intentions you instilled in it during the creating process. Enjoy!